DonCorson
[AHCI]
3358

And the Watchmakers… what do they do ? part 1

And the Watchmakers… what do they do ?
by Don Corson, September 2011
We
have been to many companies that make watches together. We have seen
the machines. We have seen the parts being made. Once in a while we
have looked over the shoulder of a watchmaker at work. But what is
their real part in watch production? Once we have all the parts, how do
all those parts “fall together” ?
I had the chance to answer
that question during a day-long visit to Armin Strom in Bienne. I was
able to follow a watchmaker as he assembles a complete watch; all the
steps from a tray of finished and decorated parts to a working and
regulated watch. Exactly all those steps that we have been missing in
the genesis of a watch. Simon, our watchmaker for the day, let me take
pictures of all the steps. It was easy to see that Simon’s mastery of
his work, many times I had to slow him down just to get a picture.
We
are starting on a journey which is not for the faint of heart. More
than 200 pictures, when I am not getting in the way approx. 4 hours of
concentrated work. And note; the watch we will be assembling is a
relatively simple 3 hands, small seconds watch with power reserve
indication, an Armin Racing One Week. This is not a big complication.
And we will be seeing only the final assembly. Many of the parts are
already preassembled.
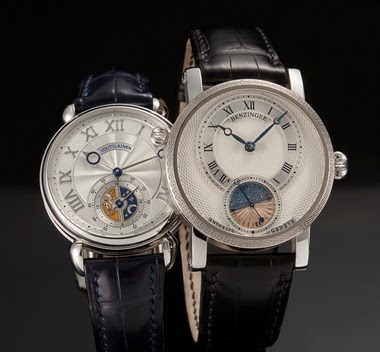
Just to whet your appetite, the finished watch, an Armin Racing One Week:

For your memory, here is the link to my visit 2 years ago where we visited the machine shop.
ahci.watchprosite.com
And here the visit to a Formula 1 training to celebrate the launch of the Armin Racing collection.
home.watchprosite.com
We will start with a quick look at the parts trays, the parts separated more by their position in the calibre than by function.
The plate and bridges:

The barrel:

The dial side winding:

Some bridges:

Winding and setting components:

The ratchet spring and bridge:

The motion bridge and components:

Escapement components:

Our work bench is well ordered:

Last preparations:

Let’s
go! A quick inspection of the plate shows us that there is still one
jewel missing. The pre-assembly preparation of the plate includes
inserting all the jewels and pins and axles. The jewels will have their
positions regulated to have the proper end shakes of the axles.
Simon started out by finding the necessary jewel, placing it in its new home and pressing it home with the jewel press.


Now we
will prepare the barrels by inserting the mainsprings. The springs are
supplied by the mainspring manufacturer pre lubricated with a ring
holding them rolled up smaller than their size in the barrel. As such
it is easy to place the spring in its ring on the barrel, press the
spring out of the ring and then insert the barrel axle making sure that
it hooks properly into the hole in the end of the spring.


Then
the barrel cover is pressed in place using a tool to avoid blemishing
the decoration. A quick brushing with a leather assures that all is
well before the axle is lubricated where it fits in the barrel case and
cover. We will see much lubricating using an oiler throughout the day.
The idea of an oiler is to put just the amount of oil necessary for the
current application on the tip of the oiler. This is then transferred
to the bearing. In this way it is not possible to put too much oil on
the bearing. For the miniscule quantities needed it is impossible to
control the flow of the oil. Here the quantity is controlled simply by
dipping the tip of the oiler more or less deep into the oil. Then all
of that oil is transferred to the bearing.


Then this procedure is repeated for the second barrel.
Simon continues to mount the winding and setting mechanism.

The winding pinion and sliding pinion are mounted on the stem…


which is then inserted in the plate.

The setting lever is then mounted on the dial side…


and fixed with its screw from the bridge side of the movement.


Now we check that the movement of the parts is OK and add a drop of oil on the moving surfaces..


Next we
will be mounting the first wheels. The “mobiles”, wheels and pinions,
have already been mounted in this kit, but Simon shows me how it is
done. To start the pinion is placed on an anvil of the right size in
the staking tool. Then the wheel is put in place and gently pressed in
place being careful that it is centered and not to deform it using a
stake with an inner diameter slightly larger than the pinion.

Then
using a smaller stake and a watchmakers hammer the two are riveted
together by bending over the corner of the wheel seat on the pinion.

Now the mobile is checked for flatness and concentricity on a special tool.


Now it is time for a break. Time to rest the eyes, or do crossword puzzles, or both.

After the break we will continue.
To go to "And the Watchmakers… what do they do ? Part 2" click here
This message has been edited by MTF on 2011-09-30 09:06:25 This message has been edited by MTF on 2011-10-04 01:16:09


And the Watchmakers… what do they do ? part 1
And the Watchmakers… what do they do ? part 2

And the Watchmakers… what do they do ? part 3

HQ posts.

There should be a prize . . .
I knew we were in for something good as soon as I saw your byline.

Fantastic post, Don


Thank you....

What a fantastic...

Brilliant post!
Great post Don.

Amazing post Don...

The watchmaker: how a fascinating profession!


It took ages
Thanks Don ...

What a post, amazing!!!

Wonderful assembly report, Thank you. But how long really?
Design, development and industrialisation...

Thank you for this "voyage"

Thanks Don,

Thanks for a excellent pictorial tutorial on watch assembly

Thanks for this brilliant Master Class, Don.


Mostly about assembly
Touch of the file...

Thanks so much for this brilliant series, Don!

Thanks a lot for this superb post Don!
It's nice to see


Great report - I find attachment forms